
Warrior
The Warrior is naturally a melee Class in Tera, with high damage attacks and evasive skills to avoid damage. Warriors are extremely mobile on the battlefield and are adept at attracting aggro.
BEFORE YOU START:
Please turn off Print Layout (View > Print layout > uncheck) for a better reading experience, and navigate using the Document Outline (View > Show document outline > check)
First of all Hi, I’m Askii one of the best Warrior DPS playing right now on the EU server on console (and I got the first world wide clear in Bahaar on console lol). I love this class because of the gameplay being really fast and the mobility of the class is huge. This is gonna be a basic Warrior guide so I see less people using useless glyphs or rolling wrong. However, this is going to be a Warrior DPS only guide. Also this is my POV about the class. Some might do different things than I do and still put out good DPS. As you can already imagine, this is gonna be a console exclusive guide.
What I also wanna say before we start is that Warrior is a hard class in comparison to other classes. This being said, it can take months of practice to get the feeling of the class. So don’t expect to learn this class as fast as other, easier classes like valk, reaper or sorc.
Since Warrior puts in a lot of skill and knowledge it’s kinda hard to tell where (DPS wise) the class is compared to other classes. However Warrior is better then most classes right now as for example gunner or slayer. In my opinion Warrior is like the 3rd last or 2nd last place DPS wise. But again a good Warrior can out DPS a bad Valk or reaper.
Skill Breakdown:
Combo attack

Function: damage, Stagger (in PvP)
The combo attack skill that every class has a variation of. Using combo attack applies a buff which increases the casting speed on successive combo attacks for a short while once stacked to 10 stacks. However, outside of PvP, it is pretty much useless once you learn the more useful damage dealing skills of Warrior.
In PvP, the second part of the combo attack staggers players.
Evasive Roll

Function: I-Frame
Can be chained into Scythe.
Your bread-and butter i-frame (invincibility frame). Dodges incoming enemy attacks, and moves you in the direction that your character is currently moving towards. Costs 500 resolve per usage, 380 if glyphed.
Torrent of Blows

Function: Frontal Block, Damage mitigation
This skill does a decent amount of damage for a, in A-Stance, standalone skill. In D-Stance, it can be chained into Blade Draw after a successful block, and is one of the strongest Blade Draw chains in that situation. In A-Stance, it can be used to block attacks that would otherwise have to be iframed, for example the tail-strike of Lachelith. This block effect also applies in PvP.
Due to its long cast animation, the skill is very situational and should, for the most part, only be used for non-iframable attacks.
Rain of Blows

Function: Damage, Edge-stacking, Damage mitigation, super-armor, Filler
Can be chained from Poison Blade and Blade Waltz
Can chain into Scythe or Reaping Slash
Filling a vast variety of functions, it is one of the first damage dealing skills you will learn as a Warrior. It is one of the best filler skills that Warrior has due to high overall damage and versatility, and while used, provides a nice chunk of damage reduction. It consists of a total of 7 hits. It is also a super armor, making you immune against attacks that would otherwise stagger or knock you down.
Stacks 1 edge.
The super armor effect also applies in PvP.
Battle Cry

Function: Aggro-shout, Stun
One of the two skills you can use in defensive stance to guarantee aggro to yourself for 5 seconds, best used if you lose aggro for a second to quickly gain it back.
In PvP, it briefly stuns opponents.
Assault Stance

Function: toggle, self-buff
One of your two skills that should always be active, as not using them impairs your overall performance.
Provides 18 power, 55 crit factor, and increases skill damage by 10% against monsters. Also decreases your own endurance by 10%.
In short, it provides a substantial amount of damage and should always be active when you are DPSing.
Defensive Stance

Function: toggle, self-buff
One of your two skills that should always be active, as not using them impairs your overall performance.
Provides 25% endurance, increases balance factor by 30 and lets attacks draw 120% more aggro. Also provides immunity to push-back from monsters when positioned correctly.
The 15% extra crit sadly don’t add up as expected, and only provides a minor boost in your critical hit chance.
Regardless, your D-Stance should always be active when you are Tanking. It gives you access to Cross Parry, your main blocking skill, which you will also use to cancel skill animations.
Death from Above

Function: I-Frame, Edge-stacking, Filler
Warriors longest I-Frame ability. Useful to dodge attacks when you are not used to the exact timing yet, or for long duration attacks (ex. Manaya’s bomb). Also stacks 1 edge when you connect with the attack.
Has a long ending lag, which is punishable especially in PvP scenarios, therefore should be used with caution.
Poison Blade

Function: Edge-stacking, Scythe Chain, Rain of Blows Chain, Filler
Chains into Scythe, Traverse Cut Chain.
Warriors best filler skill. Stacks 2 edges while having a fast animation. Has low base damage in return.
The Poison effect itself is not noticeable, to the point where it is simply useless in both PvE and PvP scenarios.
Retaliate

Function: Escape
Puts you back on your feet when you get knocked down. Applies a short immunity to any CC except fears for 2 seconds.
Mostly used in PvP, and for some bosses which still have Knockdowns in their arsenal.
Charging Slash

Function: BD-Chain, Mobility, Filler
Can chain into Blade Draw
Makes you quickly charge forward around 18 meters. Stacks 1 Edge when it connects. One of the fastest Blade Draw chains.
Also useful as a filler when at uneven edge numbers or to manage edge stacks better, since its animation is fast enough.
Vortex Slash

Function: BD-Chain, Aggro-shout, Vacuum-Pull
Formerly the best chain for blade-draw, it is now more of a secondary priority Blade Draw chain for rare situations where you end up 2 or 4 edge short of your next best optimal step when your Blade Draw resets.
In D-Stance, it has the same effect as Battle Cry, giving you 5 seconds of maximum aggro. It should be prioritized over Battle Cry should the situation call for it, as it is much faster.
It also can pull smaller monsters together, making it excellent for grouping and killing many monsters at once. The same effect applies to PvP.
Rising Fury

Function: Edge-Stacking, BD-Chain, Damage Reduction, Mobility, Filler (in D-Stance), Stagger + Knockdown
Chains into Blade Draw
Another versatile Blade Draw chainer which gives you 50% damage reduction while using it, and also moves you a good bit forward while using it. Consists of 2 parts, with the second part applying 1 edge stack.
In D-Stance, it is possible to perform a special technique called RF skip, which speeds up this skill immensely.
In PvP, the first part of the skill staggers, the second part knocks enemy players down.
Deadly Gamble

Function: Class-specific Steroid buff
Warriors main source of damage. During this buff’s duration, you have 50% higher crit chance on all your skills and the skill cooldowns of melee attack skills are halved.
Also, your edge generation from Blade Draw and Rain of Blows is doubled, allowing you to extremely quickly unleash a barrage of Scythes, giving you high burst damage.
With the Awakening, when activating Deadly Gamble, you also gain Tempest Aura II, which gives you more damage, attack speed and cooldown reduction for 10 seconds.
Cascade of Stuns

Function: Stun, Stun extender
Can chain into Rain of Blows
A rather weird skill in its function. When used on a stunned target, it applies another stun effect for around 2 seconds. Nowadays, only really used in PvP to keep targets in a stun-lock.
Backstab

Function: Edge-Stacking, Repositioning, Filler, Initiator, I-Frame, Stun
This skill has very different usages depending on the scenarios it is used in. In PvE, it acts as both a 2 edge filler (if glyphed) and a repositioning tool, but it can also be used to quickly get to the bosses back and start attacking from there with a 2 edge headstart.
Stacks 1 edge (2 if glyphed).
It should never be used in D-Stance in PvE because it will result in the boss turning.
In PvP, it is one of the most broken skills to exist in this game. As of the current patch, backstab can stun targets EVEN THROUGH BLOCKS, and applies one of the longest stuns in the game.
Staggering Counter

Function: Situational Stun
Only usable in A-Stance
Can only be used 5 seconds until after a player was hit by an attack
Another stun in the Warriors arsenal, though it is mostly used only for defensive purposes in PvP with Assault Stance. Note that it can also be casted after blocking an attack with torrent of Blows.
Smoke Aggressor

Function: Aggro-securer, Damage Mitigation
Costs 20% of your own max HP
When used, it provides a buff that decreases all damage taken by 50% as long as the smoke aggressor is alive, allowing you to facetank attacks that you usually couldn’t, especially when combined with other skills that have damage mitigating effects. Also, all your aggro is transferred onto the aggressor when used. However, this function is pretty useless in almost any scenario.
Command: Attack

Function: Smoke Aggressor-specific control skill
Sends your smoke aggressor to attack the target that you are aiming at.
Almost never used in practical scenarios.
Command: Follow

Function: Smoke Aggressor-specific control skill
Recalls your smoke aggressor back to yourself, making it follow you.
Almost never used in practical scenarios.
Traverse Cut

Function: Buff, Party Buff (in D-Stance), Blade Draw Chain
Chains from Poison Blade, Pounce, Blade Waltz.
Mostly used as a Blade Draw chain, Traverse cut applies a buff which increases your, and, if you are in D-Stance, also the Attack speed of your party members by 0,9% per stack, and stacks up to 13 times, making it a total of 11,7% attack speed, which you can, and optimally should, permanently keep active.
Pounce

Function: Edge-Stacking, mobility.
Can chain into Blade Draw, Traverse Cut or Rain of Blows.
Can be used to move fast over bigger gaps. Also used as a fast (when glyphed) chain for Blade Draw. You can use the skill 2 times in between 10 seconds.
Stacks 1 edge
Blade Draw

Function: Damage, Edge-Stacking, Main Damage skill
Chains from Vortex Slash, Charging Slash, Rising Fury, Traverse Cut, Blade Waltz, Cross Parry (D-Stance only, after a successful block), Torrent of Blows (D-Stance only, after a successful block)
Chains into Scythe.
This skill is your bread and butter and should be one of the highest priority skills. Blade draw chains should be used as often as possible, as they are the most efficient and damaging edge-stacking chains.
Stacks 1 edge, 2 if glyphed.
Scythe

Function: Edge-Consumer, Main Damage Skill, Knock Down
Chains from Blade Draw, Poison Blade, Roll, Blade Waltz, Pounce, Rain of Blows
Consumes all your accumulated edge for massive damage.
Even more important than Blade Draw when it comes to damage, before you get your awakened skills, Scythe is your most important damage skill. With its glyphs, it has a very high innate crit chance and contributes to a large amount of your overall damage. Never use it under 8 edge and do everything you can to use it at 10 edge.
In PvP, it knocks down enemy players it connects with.
Reaping Slash

Function: Low Priority Edge-Stacking Skill, Knock Down
Chains from Combative Strike and Rain of Blows.
Before the awakening, you would use this skill whenever you expected to be at an uneven number of edge before your Scythe to make it to 10 edge regardless. However, it has low base damage and, if not canceled, a long animation.
Nowadays, if it is used, it is so mostly as a 2-edge combo with Blade Waltz, or a 4-edge Combo with Blade Waltz, Rain of Blows, and Death from Above, since other skills, in all its intents and purposes, are more usable as a 1-edge-filler.
Stacks 1 edge.
Knocks down players in PvP, but has a comparatively long cooldown.
Cross Parry

Function: Block, Animation Cancel
One of your most important skills when playing Warrior Tank, it can be used to both block attacks and cancel skill animations prematurely, allowing you to use more skills in the same timeframe.
On a well timed block, stacks 1 Edge, restores 5% mana and reduces Scythe cooldown by half a second.
Can chain into Blade Draw after a successful block.
Smoke Flanker

Function: Aggro-Secure, Stun
Remove this skill. Only usable after a successful block.
In all seriousness though, when you use this skill, you teleport to the back of the boss, while creating a smoke flanker that has all your aggro (and an insane amount of HP) and will continuously generate and hold it until it disappears.
Can be used to save your party from near wipes, but most of the time otherwise, using this skill puts you into bad situations. I advise you against learning this skill at all if you have the chance.
In PvP, it also applies a short stun on the target, but is inadvisable to rely on with its very long cooldown.
Binding Sword

Function: Pull, CC
Only really used in PvP nowadays. Use it to pull up to 4 targets towards yourself and force them into a stagger while doing so.
Infuriate

Function: Force Enrage
Enrages the boss for 36 seconds. Should always be used at the start of any fight as a Warrior Tank.
AWAKENING SKILLS
Blade Waltz

Function: Damage/Edge-Stacking/Animation Cancelling/Chainer/ Block (Dstance)
One of the awakening skills. This skill can chain into almost every relevant skill in a Warrior’s arsenal, and can also cancel the animation of every skill, making chains faster. Useful, for example, to cancel the animations of Scythes when in A-Stance.
You can use the skill twice in between a 3 second window, each hit stacks 1 edge.
In A-Stance, it provides a crit chance boost for the duration of the next skill that you use. double crit chance on the next skill. This essentially turns, for example, a glyphed Blade Draw to a triple crit chance skill.
In D-Stance, it functions like Torrent of Blows, but with much more usability.
This skill has a higher than usual innate crit chance.
Aerial Scythe

Function: Edge-Stacker, Edge Consumer, Main Damage Skill, Animation Cancelling, Stagger + Knock Down, Damage Reduction
Chains into Blade Frenzy
Another awakening skill which deals massive damage. It consists of 2 parts, the first part stacks 2 edge, and the second part consumes all stacked edge and deals massive damage. However, unlike with Blade Waltz, you can not use any skills in between.
The second part of this skill, which deals the main damage, is in almost any situation a guaranteed crit, regardless of crit factor and from where you hit. Cancels other skills. Has 50% Damage reduction.
In PvP, first part staggers, and the second part knocks down players.
Blade Frenzy

Function: Ultimate Damage skill, Nuke
Can be chained from roll and Aerial Scythe
The final active awakening skill, and the final active skill we will go over, Blade Frenzy is a Warriors’ long CD(if not used in Deadly Gamble) nuke . It is best used after the first Aerial Scythe when using Deadly Gamble, since it will still profit from the damage increase from the Shadow of the Tempest II buff without interfering with the cooldown of Aerial Scythe itself. Has effectively 100% crit chance.
Knocks down players in PvP.
Warriors also have a number of passive skills, but for all intents and purposes, we will keep it at the most important:
Head on

Increases crit power by 18% when attacking monsters from anywhere except the back. This means that Warriors attacking monsters with a Wrathful crystal from anywhere but the back will have equal crit power to a Warrior that is DPSing from behind. Note that your crit chance is lower when attacking from the side or front though.
Tempest Aura

Applies a buff which stacks up to 50 times and, for each stack, increases your attack speed and cooldown reduction by 0,1% each. At 50 stacks, this buff gets overwritten with a stronger version(10% dmg increase, 5% atk speed increase and 5% cdr). After the buff expires, the stacking process begins again.
Also activates Tempest Aura II for 10 seconds when Deadly Gamble is used, which is the same buff, but even stronger, with 10% damage and 7% attack speed and cooldown reduction applied on top.
Ready Blades

On every successful Blade Draw hit, you decrease the cooldown of Scythe by 0.5 seconds.
On every successful Scythe hit, you decrease the cooldown of Aerial Scythe by 1 second.
Basically, this assures that a.) your Scythe will always be up at 10 edge, and b.) that your Aerial Scythe will always be up after using 2 Scythes if you play properly.
Uplift

Traverse Cut increases Blade Draw dmg by 1,8% with every successful hit. Can be stacked up to 10 times.

GEAR:
For the weapon you want to roll 2x 7,2% cdr and then the basic DPS rolls. However you can roll 2x 9,3% on your weapon but then you only want to burst in enrage. Every top Warrior these days plays 2x 7,2% CDR since you can burst off cooldown which means you can push the boss to the next enrage faster. You can also try to sync your DG witch priest or mystic Buffs since they should use it off cd as well and the cooldown for example edic and deadly gamble cd are really close nearby.
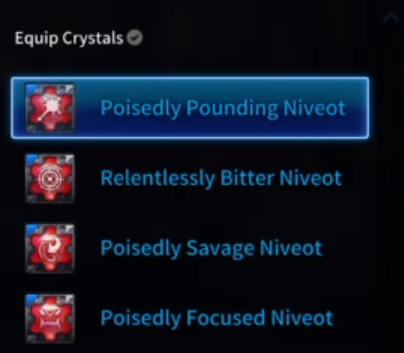
For the crystals in your weapon you want to choose: Pounding, Bitter, Savage and Focused. As 2nd stat you are looking for “Reduce dmg from enraged monster by 2,2%” or “increase maximum HP by 1359”.

For the chest you want to use 10% dmg on BD as top roll and the other rolls are again the same as for every DPS. 10% less CD on BD as top roll is not recommended.
For the chest crystals, you just choose 4 Hardy crystals. For the 2nd stat you want “Crits replenish 60MP when atking from behind” or “Replenishes 11MP per 5sec”. But the best stat is probably the one from Brutally Hardy niveot ( 2,4% more dmg on knockdown opponents). Reason being is that this DMG also applies to bosses like Manaya after her shield phase.


For gloves it’s pretty obvious what you want to roll.

For Boots you normally go instead for “increase resistance to knockdown and stagger from boss attacks by 35%” for increase movement speed by 6%. I only rolled because in some endgame dngs you get a ton of knockdowns and stagger( imc you fk).


For the Circlet you want to choose the Improved Transcendent Circlet. However the more CDR you get, the better the Improved Mystel Circlet gets. But in the end, the difference between both Circlets isn’t that high. On top, the Improved Transcendent can get very expensive after many fails compared to the Mystels Circlet that always has a 100% upgrade chance.
For the rest of the gear you can double roll the same stat for example on brooch 3power and 2power. But only when you have more than enough crit.
I personally roll 0,04 crit power on the rings, but can as well run crit or double power.
For the Mask, you want to use the energetic one from Bahaar. On the Mask you want power or crit rolls.
Bracelet is always the same so there is nothing to talk about there.
For etching you go energetic on your weapon and gloves. On boots and chest you go with grounded ones. On rings, earrings, necklace and brooch you go with Power or crit, depending on how much crit you have. If you need more crit go crit etching, if not then go power etchings.
GLYPHS:
In this part I will first show you my glyph set up. Keep in mind that I might have more glyph points than you ( I have 64). I will show you what glyphs you have to choose and which are optional.
(ER)

For Evasive roll I go with the swift and Affirmative glyph because you will use this Iframe the most in a dng and then always having a chance by 40% to get a ATK speed Buff is a must. The Affirmative glyph allows you doge you 1 more time with full Stamina. This gives you better movement options in dng. Maybe this glyph is not always needed but more often than other glyphs.
(DFA)

Since Death From Above is a very long Iframe, it can save you in many situations.That’s why I put the CDR glyph in. The swift glyph has a chance of 50% to give you an ATK speed buff, so 10% higher the Evasive Roll. What you need to know is that the glyph can proc when you use the skill and not when you hit with the Skill. On top, Death From Above is cancelable with before Death From Above even hits. That makes this Iframe very useful and often better then Evasive Roll.

(RoB)
Rain of Blows is your number 1 filler and it does some decent dmg so with even more dmg due to the glyph you do nothing wrong.

(CS)
For Charging Slash I go with the CDR and Powerlink glyph. Charging Slash can be a good 1 edge filler and often I follow up with or something other with
having then a 50% on BW is a nice little dmg boost. I like to use the CDR glyph since you can use the skill also for movement and not only as a filler or
chain. Having the less CDR just gives you more free use of the skill and makes your edge stacking potentially faster.

(DG)
Deadly Gamble is your main DMG source, having it faster up again and longer buff time is a must.

(BS)
With the Advantageous glyph for the extra 1 edge generation and the CDR glyph Backstep can not only be used as a skill to get behind the boss fast. With that you can use it as a 2 edge filler.


For Pounce using the Hastened glyph allows you to use it as a fast chain for or
and you can move around really well with it. The reason why I think the CDR glyph is not needed is because you can use it 2x in a row anyways and you shouldn’t need it too often as a chain because
(with an extremely low CD) has always a higher priority when it comes to chains.

(TC)
The advantage of the Lingering glyph is that you wont need to traverse cut in to keep up the atk speed buff and you can focus more on chains. However you should always keep an
eye on the buff and it should be 100% the time up in a boss fight.
(BD)
BD is your highest chain priority so you want more dmg with the Empowered glyph and with the extra crit chance from the Craving glyph. With the extra edge generation from the Advantageous glyph you stack edges way faster so you can or faster. The Persistent glyph is a must have like every other glyph for BD, with a chance of 60% of BD resetting you edge stacking can get way faster and your dmg will be significantly higher.


Scythe is after and your hardest hitting skill. More dmg and the craving glyph are must have.

(BW)
As said earlier is your main filler, with an extra 15% dmg after BW the skills dmg gets even better. There is no need for the Lingering glyph as Tank or DPS because you spam the skill constantly.
Ok, this is my glyph set up. But as said I have 64 glyph points. You probably not (btw to get more glyph points you need to lvl your Hunting lvl, PVP lvl and Adventure and each lvl 15 and 30 you get 1 glyph point+. Means in the end you can reach a maximum of 66 glyph points).
The most important glyphs are the one in Blade Draw, Scythe, Deadly Gamble, Evasive roll, Rain of Blows, Death from Above, Traverse cut and Backstep (generate 1+ edge)
If you have glyph points left, you can put them in:(Hastened glyph)
(Energetic or Powerlinked glyph),
(Both Powerlineked glyphs. However I only recommend the Powerlink glyph for
because
doesn’t make that much of a dmg or that you would even use it more then Rob that it would make sense to use it)
(Energetic glyph).
RACE:
To be honest between each race isn’t a real noticeable difference. That being said, just play the race you like the most. However, castanic gives you a small crit buff of 1%. But as said, it’s not really much that you must go for castanic. For player with a higher ping Elin is better though because of the animation. One more slight difference for Castanic and Elin is that Elin has the highest reach on rising fury and Castanic the highest reach on pounce.
CRIT:
(All what I will say here includes that you have A-Stance on)So let’s get to the crit factor… I see many people running with only +167 crit( or something around that). Personally I play with high crit( +210 – +220). However I recommend running about +180 crit as a beginner to push the DMG more into Scythe and Aerial scythe. For People who know the class well, I recommend running about +210- +220. With that crit your Blade Draw will crit way more often. If you have good BD HPM(hites per minute) your BD damage can be higher than someone’s scythe DMG.
In Bahaar you will need more crit. I run with about +240 – +250.
Priorities and Edge Stacking:
So this is maybe the most important section of the guide. Personally I do all the stuff by “feeling, situation and prios”. That means I don’t have a specific rotation( In general stop thinking about Warriors as a “rotation-based”-class it plays more by chain priorities.) But I will mention the main priorities here( they are not in a real order).
DISCLAIMER: If you use it puts you in the full animation. The first 4 hits are only cancelable with
,
,, for the rest 9 hits you can also cancel with
. I only recommend to use more then 4 hits of
if you about to use
. Even Though the skills gives you dmg buff on the next
for a few seconds( max 10 stack. 1 stack= 1,8% dmg) it’s just not worth it to always wait for
to hit 10x to get the full buff and if you always do
(10x)
you lose the double crit chance buff from
for
what ends up in
not critting and you wasted a lot of time with
(10x).
Main:
Blade Draw chains:
(reminder Traverse Cut generates 2 edges after the first 4 hits)
Blade Waltz -> Blade Draw
Charging Slash -> Blade Draw
(can be a lower priority if you utilize Charging Slash more as a filler)
Pounce -> Blade Draw
Blade Waltz -> Traverse Cut -> Blade Draw
Vortex Slash -> Blade Draw
Rising Fury -> Blade Draw
Pounce -> Traverse Cut -> Blade Draw
Poison Blade -> Traverse Cut -> Blade Draw
4 Edge Fillers:
Poison Blade -> Traverse Cut(4 hits)
Charging Slash -> Blade Waltz -> Rain of Blows -> Reaping Slash
3 Edge Fillers:
Blade Waltz -> Poison Blade
Charging Slash -> Blade Waltz -> Rain of Blows
Blade Waltz -> Rain of Blows -> Reaping Slash
Poison Blade-> Rain of Blows
Blade Waltz -> Traverse Cut(4 hits)
Pounce -> Traverse Cut(4 hits)
Pounce -> Rain of Blows -> Reaping Slash
2 Edge Fillers:
Blade Waltz -> Rain of Blows
(if Blade Waltz is up, but Blade Draw isn’t – mostly after non resets)
Poison Blade
Pounce -> Rain of Blows
Backstep
Blade Waltz -> Reaping Slash
Pounce -> Blade Waltz
Blade Waltz -> Pounce
1 Edge Fillers
Blade Waltz
Charging Slash
Pounce
Ok now where we have the priorities done I want to talk a bit about the gameplay. First of all, out of gamle you want to rotate between 1 and 2. This changes in . Due to the CDR buff from you can rotate between 1 and 1. The more edges you have, the more dmg your or deals. Means you always want to use scythe or aerial scythe with 10 edges.
REMINDER: Warrior doesn’t have a static rotation in any real boss fight, where you also have to deal with mechanics, the priority of your chains might always change depending on the situation. You will also need to deal with RNG, Human error, FPS issues, Ping spikes etc.
OPENING: Here I will give you an example on how to start a boss fight
()//<- with a priest your Aes will be ready again but with a myst it will still have some cd. So depending on what healer you play with, your Deadly Gamble rotation changes. However if you get enough CDR with the Stigmas you have, you will be able to do the priest version of the opening also with mysts.
You can also cancel Blade Frenzy with Evasive roll to proc your Attack speed glyph. However this is a bit risky because you may cancel too early and the big hit doesnt hit.
DEADLY GAMBLE:
Deadly Gamble is for Warrior the main source of DMG. We also know that
doubles the edge generation of and
. With that said let’s get into it.
Your goal in Deadly Gamble is to hit as many Aerial Scythes, Blade Draws and Scythes as possible.
The perfect scenario would be if Blade Draw would reset over and over again.
10 Edge ->
/
<- Instant Skip
Should you not reset, you use Rain of Blows or Poison Blade into either Aerial Scythe/Scythe, depending on the healer and which Scythe.
Aerial Scythe, Priest:


Aerial Scythe, Mystic:

Scythe, Priest/myst:
For , you should always try to sync it with your Dragon. However you should also only use
in because of the low cd you will have on
in every once. You should never use
out of .
There are rare situations where you can use out of for example when a boss has 1% HP left and your group is about to wipe. Using a
then is every reasonable and I would do the same.
Also can be used as a last resort Iframe. However, Warrior has many Iframes and options to move around for example with
. And if you use it as a last resort Iframe, keep in mind that you won’t have
for the next 2 upcoming.
If you get CD locked because of Buffs(beer/Arush/brooch etc.) you have basically 2 options on how to continue.
Use or to spend time until
comes up again(this should only be used for
because after a
you normally want to to cancel the animation or continue with lower priorities )
That means you use or after
. YOU DON’T WANT TO GENERATE A EDGE WITH DEATH FROM ABOVE.
The advantage of doing this is that you can still keep spamming
, and have a chance of gaining additional Attack Speed from the Glyph on
or. It also guarantees that if is up after a Scythe, will also be up as well.
//
()…
The problem on console is that, if you don’t have a next gen console, you will have FPS and/or Ping issues what makes canceling of animations with harder than on PC or next gen consoles.
You can also continue with lower priority chains but there is a downside of it. So lets say when using instead of : you will have lower HPM which means your crit rate of is also lower.
But this all is just IF you get CD lock. Because of the lower attack speed in general compared to PC you shouldn’t get CD lock in most cases.
TIPS: Here I will just show you some basic tips that might help you maximize your edge stacking from time to time.
First of, if you get CD lock in any ways possible (that normally never happens since on console we still have 2x cdr roll on your weapon + Bahaar mask + the new Stigma system) is a good skill to cancel your animations while spending a bit of time so your skills can come up again + you have a chance that your attack speed glyph can proc. As an example, imagine this:
at this point you notice, that
still has a CD of 2sec. So instead of doing
(in this situation you would need to start the next
or
rotation with something like this
)
I would do this because of the extra roll between, the CD of
had a bit more time to go down which means we can start the next
or
rotation with
and not with
.
STIGMA:

Ok so since this whole new Stigma system is pretty new and no one is really far right now with it, I will just say why I go with a full cdr build.
The reason for that is your can reach a CD of around 20~25s. Which means you will have your Deadly gamble Buff around 100% of the boss fight. While you are in you have so less CD of your skills that you will only spam
. However you can also go for a flat dmg % build since it’s also very strong and can probably compete with a CDR build. Since the Stigma is very painful to farm and also changing stats is random so it’s hard to tell what the best option is farming wise. I would still recommend going for a CDR build because more CDR gets you less CDR lock so you have an easier time learning the class.
FINAL WORDS:
If you have any question or/and you find any mistakes in the guide, feel free to ask me on discord (Aski#3257 or ask me while I’m streaming (https://www.twitch.tv/askichan).
SPECIAL THANKS TO <3:
My Guild (Resurrected) love you all so much
Soka (Fanart maker) amazing work you did there <3
ASSAZINA (took some stuff from your guide and helped me make this guide. I appreciate your help a lot)
Alice my love for the life
Written by Aski (Aski#3257)